How to Find Official Visa Information for Your Destination
Visa requirements change with little warning, and outdated information costs people their flight when it comes from a forum thread written years ago instead of a government page updated last month. The right starting point is always an official immigration or foreign affairs site — never a blog, forum, or a travel agent’s summary page.
Why Third-Party Sources Get It Wrong
Visa rules are set and changed by individual governments, often with little advance notice, and travel blogs and forums update on their own schedule, not the government’s. A rule that was accurate when a popular post was written can be stale within months, and nobody goes back to edit it. Agreements between countries also shift with diplomatic relations, so what applied last year isn’t a safe assumption this year, even for the same nationality and destination.
Where to Look Instead
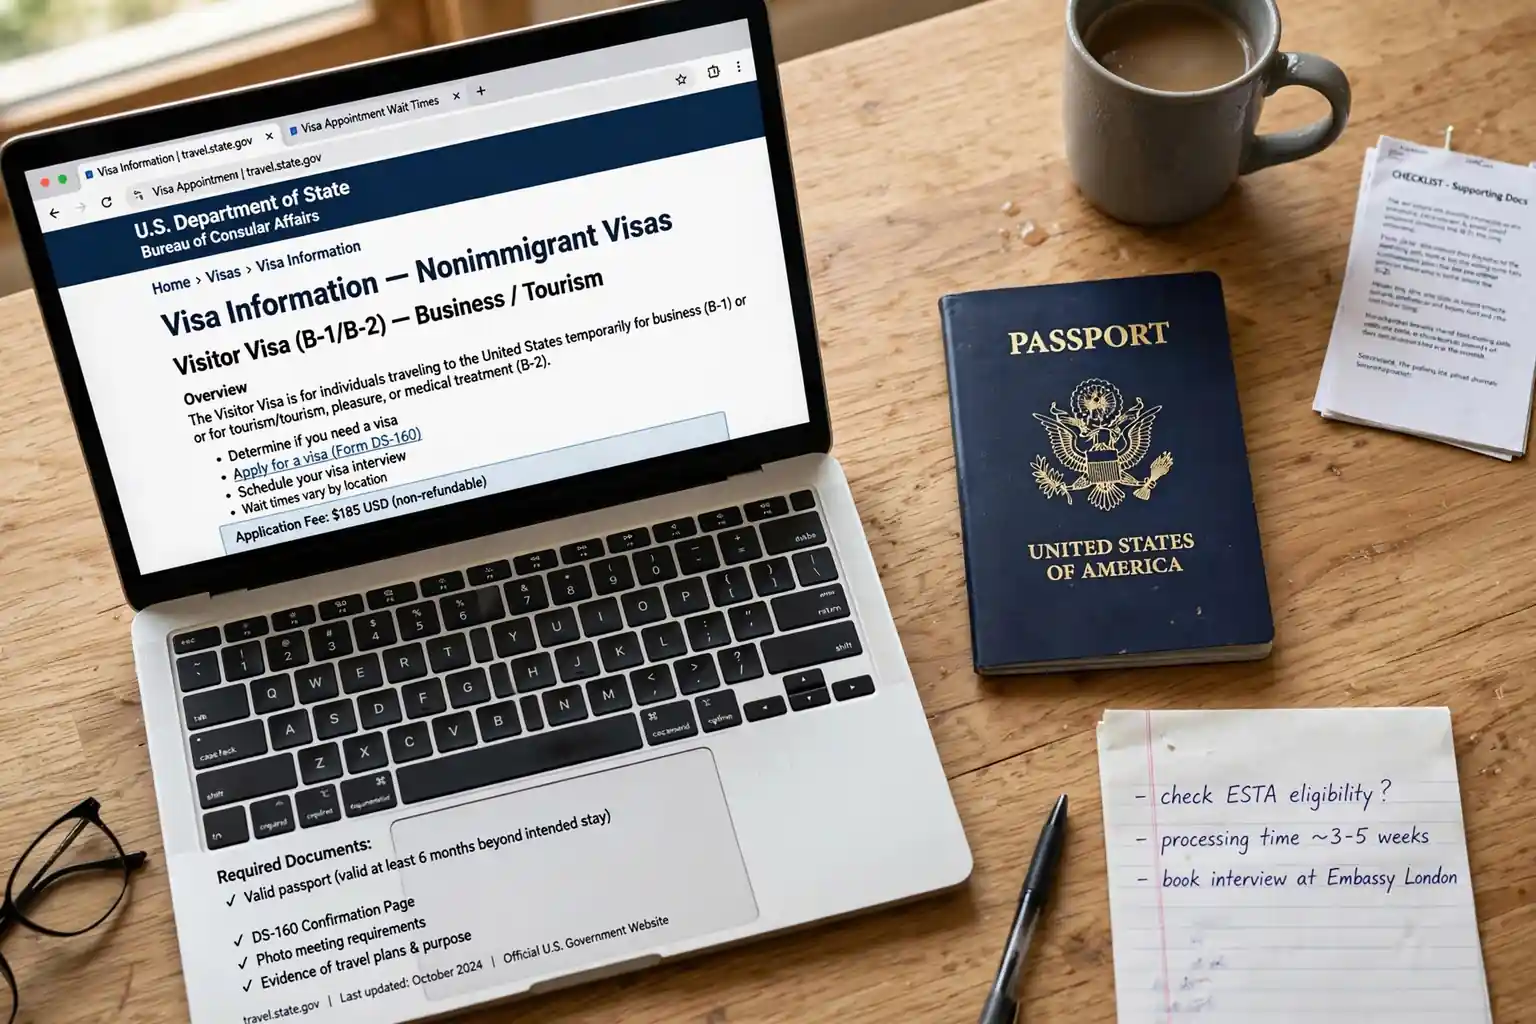
Start with two sources: your own country’s foreign affairs or state department travel site, and the destination country’s embassy or consulate site for your specific nationality — requirements vary by passport, not just by destination. A government foreign travel advisory page is the model to look for: official domain, a visible date of last update, and requirements broken out by nationality rather than a single blanket answer. If the destination uses an e-visa or electronic travel authorization system, apply only through the official government portal — a wave of lookalike sites charge a markup to submit the same form you could file yourself for less.
What to Check Beyond the Visa Itself
Even under a visa waiver program, other requirements can still apply — passport validity of six months beyond your travel dates, proof of onward travel, minimum funds, or a specific entry form. These trip up travelers just as easily as a missed visa would, and they’re listed on the same official pages if you read past the headline answer.
Bookmark the official page instead of a screenshot from a forum thread, and check it again close to your travel date, not just when you book. If you’re already working through the rest of a pre-trip checklist, add “recheck entry requirements” as its own line item, separate from packing or confirming your flights, since it’s the one category that can change after everything else is already locked in.
A five-minute check on the right site beats an hour of confident-sounding advice on the wrong one.
By now you know the official sources exist and where to find them. The trickier part is what to do once you have those sources open in front of you. Visa information is not always written in plain language, requirements change with little fanfare, and the gap between what a government website says and what happens at a border can be confusing. Here is how to read official visa information correctly and act on it without guesswork.
Learn How Governments Actually Publish Visa Rules
Most governments publish visa rules in more than one place, and those places do not always say the same thing. A foreign ministry might have a page that says citizens of your country can enter visa-free, while the embassy page for the same destination lists a fee and a two-week processing time. When sources disagree, the embassy or consulate that will handle your application is the one that matters, because it is the office that actually decides.
Look for pages with “immigration,” “visa policy,” or the destination’s foreign affairs ministry in the title. These tend to carry the authoritative version of the rules. Tourism boards often simplify details to attract visitors, so treat their visa pages as summaries rather than the final word.
Another habit worth building is checking the publication or “last updated” date on official pages. A page updated last month carries more weight than one untouched for two years. If you cannot find a date, treat the information as unverified and confirm it directly with the consulate.
Read the Requirements Like a Checklist, Not an Article
Visa pages are often long and dense, which is exactly why people skim them and miss things. The fix is simple: pull out every requirement and turn it into a checklist of its own. Typical items include passport validity (often six months beyond your travel dates), blank passport pages, a specific photo size, proof of onward travel, bank statements covering a set number of months, and a hotel reservation or invitation letter.
Pay close attention to the fine print around each item. A bank statement requirement that says “last three months” means exactly that; submitting two months gets the application returned. Photo specifications are another common rejection point: dimensions, background color, and how recently the photo was taken are all specified for a reason, and consulates do enforce them.
Also note what counts as acceptable proof. Some embassies accept a refundable flight hold or booking confirmation rather than a paid ticket, which saves you money if the visa is delayed or denied. Official pages usually state this explicitly, and it is one of those details that only surfaces if you read carefully. Pair this discipline with our guide to common currency exchange mistakes so you do not lose money on both fronts of your trip planning.
Verify Everything a Second Time, Close to Departure
Visa rules change more often than travelers expect. Policy shifts can follow elections, diplomatic disputes, or public health situations. A rule you confirmed six months ago may have quietly changed since.
The U.S. State Department maintains country-by-country travel advisories and entry information at travel.state.gov travel advisories, which is a good starting point for understanding the security and health context of a destination alongside its entry requirements. Use it as orientation, not as your sole source for the visa itself; the destination country’s own immigration pages still carry the binding rules.
A sensible routine is to check official sources twice: once when you start planning, and again two to four weeks before you leave. Between those checks, consular staff are reachable by phone and email in most cases, and a short confirmation call can resolve ambiguities that no webpage clears up. When you do contact them, have your exact itinerary dates, passport nationality, and purpose of travel ready; vague questions get vague answers.
Understand Processing Times and Plan Backwards
Processing time is where most visa stress comes from, and it is almost always underestimated. An official page that says “5 to 10 business days” means business days, not calendar days, and does not count the days your passport spends in transit to and from the embassy. Add holidays in both your country and the destination country.
Plan backwards from your departure date. Start with the day you must have the passport back in your hands, subtract the stated processing time, subtract mailing time in both directions, and then add a buffer of at least a week for unexpected delays. If the math puts your application date in the past, you are not planning, you are gambling.
Some countries offer expedited processing for a fee, and others do not offer it at all. Official pages usually state whether rush service exists and what it costs; if it is not mentioned, assume it does not exist. This timing work belongs early in your planning, alongside the week-before-an-international-trip checklist, so that paperwork never collides with last-minute logistics.
Watch for Scams and Look-Alike Sites
Official visa information lives on government domains, and that is the single most reliable way to tell a real source from a fake one. In the United States, that means .gov; other countries have their own official endings, and a quick search for the country’s foreign ministry will confirm them. Sites with .com or .org endings that offer to “process your visa” are intermediaries at best and scams at worst.
Be especially careful with search results. Paid ads often sit above the real government pages, and some mimic the look and language of official sites, charging a “service fee” that can be many times the actual visa cost while adding nothing to your application. Always scroll past the ads to the organic government result, or type the known official address directly.
Embassies themselves occasionally warn about fraudulent sites on their pages, so if you see a warning, take it seriously. And never enter passport numbers, scans, or payment details on a site whose official status you have not confirmed. When in doubt, the phone number on the government site is the reality check.
Keep Copies and Stay Organized Through the Process
What to Do When Official Visa Sites Contradict Each Other
It happens more than you think: the embassy website says a bank statement is required, the consulate page doesn’t mention it, and the VFS application center’s checklist includes something else entirely. When official sources disagree, you need a tiebreaker.
First, figure out which source actually processes your application. For most countries, that is the VFS or TLScontact center handling your region, not the embassy itself. Their checklist is what the person behind the glass will use to accept or reject your file, so their list wins even if the embassy page says something different. Print that checklist and build your file against it.
Second, check the dates. Embassy pages are often years out of date — look for a “last updated” stamp or a dated notice. The VFS pages tend to be fresher because they are maintained by the company running the operation. If one page says updated last month and another has no date, trust the dated one.
Third, when the contradiction really matters — say, two sources list different fees or different required documents — call the VFS helpline or the embassy’s consular section directly. Ask a specific question, write down the name of the person who answers and the date, and bring that note to your appointment. Officers accept a note like “confirmed by phone with Ms. Ahmed on October 3” far more readily than a vague “the website said so.”
Once you have confirmed the requirements, organization is what separates a smooth application from a stressful one. Keep a folder, physical or digital, with a copy of every document you submit, the completed application form, payment receipts, and the tracking number if you mailed your passport. If anything goes missing at the consulate, your copies are your proof.
Note the dates of everything: when you submitted, the confirmation number, the date staff told you to expect the passport back. Embassy tracking systems are not always real-time, so having your own timeline helps you follow up at the right moment rather than guessing.
Frequently Asked Questions
What is the difference between a visa, an eVisa, and a visa on arrival?
A traditional visa is applied for in advance through an embassy or consulate, often requiring your passport. An eVisa is applied for online and linked to your passport electronically, without a consulate visit. A visa on arrival is issued at the destination’s airport or border crossing. Official immigration pages specify which options apply to your nationality.
How far in advance should I apply for a visa?
Most immigration experts recommend applying at least six to eight weeks before travel, longer for countries with lengthy processing or interviews. Always work backwards from your departure date using the official processing time, plus mailing time and a buffer week.
Can visa requirements change after I have already applied?
They can, though it is uncommon for changes to affect applications already in process. What happens more often is a policy change between your research and your application date, which is why checking official sources again close to submission is worth the few minutes.
Do I need a visa for a layover in another country?
Sometimes. It depends on the country, your nationality, the length of the layover, and whether you leave the international transit area. Some countries require transit visas even for short connections. Check the transit rules on the official immigration site of every country your itinerary touches.
What should I do if the official site and the embassy give me different answers?
Follow the embassy’s answer, since it is the office processing your application. Then keep a note of the discrepancy in case you need to explain it later. Embassies handle the paperwork, so their version of the rules is the one you have to satisfy.
Conclusion
Finding official visa information is only half the task; reading it carefully, verifying it twice, and acting on it with enough lead time is what actually gets you through the border without surprises. Stick to government sources, plan backwards from your departure, and keep your own records of everything. If you are building out the rest of your trip planning, Factblaze has practical travel guides on everything from packing to budgeting, all written to make the logistics of travel a little less stressful.